
I have yet to have any luck with it.
However, I did want to do something fun with it for Christmas and about a week ago, I started to get an idea. You know, one of those ideas that starts off pretty small and then before you know it, you're buying chicken wire at closing time on a Sunday night at Lowe's?
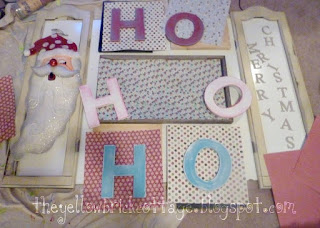
That's pretty much how my idea evolved, and here is the result:

But really, the fun part is the story of how it came to be...
Originally, the mantel project started out fairly simple. I was just going to get some chipboard letters, paint them and then spell out "Ho, Ho, Ho" over the mantel, but then it started to snowball and get bigger with every part that I finished.
I ended up deciding I wanted a wall gallery that looked kind of rustic and fun. I painted the letters and then put them in frames and glued them to the frame backs that I had mod-podged scrap book paper to.

After I had laid all the frames out in a pattern, I realized the "gallery" needed something more. The fireplace is pretty big and I needed something that would cover at least 50 or so inches. Doing just letters in frames was only going to cover about half of that. I decided it would look really cool if I put shutters on each side to "anchor" the gallery display.
Only I didn't have shutters just sitting around the house, so I had to come up with something else that would sort of have the same effect.
and then it hit me.....

PERFECT!
It was the mirror from the bedroom set that I had been given last year that was shrink-wrapped on the wall right next to me. I had originally refinished it to go with the dresser that I refinished, but I had never attached it and wasn't sure how I was going to recycle it.

I decided that the two side mirrors would be my "shutters" and I got to work taking out the staples and hinges in order to separate them. Surprisingly, I only came away with one injury between my thumb and pointer finger from a runaway screwdriver.
 |
Then, I finally started laying my gallery out on the floor, and playing with the patterns:


After looking at it for a few minutes, I decided it looked a little too "Danger, Will Robinson, Danger!!" AKA "Lost in Space-ish", so I went over the sticks with white paint and took a Christmas floral bundle apart that was $1.50 from Hobby Lobby and inserted the branches throughout the sticks. I repainted the bottom turquoise and put a red bow around it to make it look like this:

I already had the chair and birdhouse and my sister had left the bench at my house for me to sell at a yard sale that I never got to, so I set them up and then decided that the bench needed a little something, so I decided to make a "tray" for Santa.
I painted a wooden one from Hobby Lobby red and then made "cookies" out of some clay I found from a project that Diva did for school. I painted the inside of a glass white and then shoved a paper towel in for "milk". Destructo wrote a note for Santa that I also put on the tray.


My kids have food allergies and one of them, I won't say who...(Diva) always says that she is allergic to something when she doesn't want to eat it, so I took my inspiration from them.
...and that, my friends, is the story of my first ever Christmas DIY project and my first ever Christmas mantel.

Linked To:


I put a Santa in one of the frames that I found at Hobby Lobby for 50% off. For the inside of the other frame, I spelled out "Merry Christmas" to complete the entire phrase with 2 inch chip letters (which are a total rip because they only have 26 letters, so you have to buy more sets if you have a repeating letter, such as "R".) and then I finished painting everything. I was a little puzzled on how I was going to display the "Merry Christmas" letters. I thought about hanging them on a string from the top of the frame, but soon came up with another idea...
...and that's when I ended up at Lowe's on Sunday night at closing time looking for chicken wire.
 |
| It was $13 for a 10 X 25 ft roll at Lowe's in their Garden section |
I put the chicken wire in the larger frames as a backing to make it look more "farmhouse-ish".

Safety Lesson: Make sure you use tin-snippers to cut any type of chicken wire and be careful of the sharp edges, in fact it's probably a good idea to wear gloves if you don't want to scratch the hell out of your hands as you unroll and measure it.
 |
| These are my dads snippers. I didn't even know what they looked like until he loaned them to me. Originally, I was just going to attach the letters by themselves on the second screen, but after I tested it out, I knew they wouldn't be as noticeable as I wanted them to be, so I trimmed some scrapbook paper into 3 X 3 squares and painted the letters black (I also painted the chicken wire black behind the mirror frames so it would stand out a bit from the white wall). Instead of just gluing them on the wire, I chose to get those teeny-tiny clothes pins that are in the scrap booking area at Hobby Lobby and hung them on the wire individually. |
Here's where the "Cuss-Cuss, Bang-Bang" part of the story comes in:
To preface it, let me tell you that I have never hung a single picture in my life. That's right, I'm 32 years old and I haven't even hung a 5 X 7.
This time, I decided to take matters into my own hands and hang the whole gallery myself rather than have Studly do it, who had the flu at the moment. I figured it couldn't be too hard, but apparently, for me it was pretty much rocket science.
I measured carefully several times as far as the space I wanted between all the frames and the span I wanted it to be, etc. etc. I even put everything down on paper. with all the measurements of the frames themselves and the wall space.
Then, I climbed on one of the kitchen bar stools (because the ladder in the garage was just too far away...and safe...) and began attempting to hang everything. I figured that with my careful measurements, it would take no time at all...
Then, I climbed on one of the kitchen bar stools (because the ladder in the garage was just too far away...and safe...) and began attempting to hang everything. I figured that with my careful measurements, it would take no time at all...
I was so very wrong.
I found when I actually started attempting to hang the frames all those careful measurements went out the window, so I ended up putting a few extra holes in the wall:
 |
| (spackle is the greatest invention ever.) |
Anyhoo...After several F-bombs and other words you can't repeat to your mother, I did finally get everything hung and perfectly level. (However, I had to go back and "un-level" a bunch of the frames because our walls aren't level and everything looked crooked.)
Oh, another obvious safety Lesson: Remember when I said I climbed on top of a bar stool to hang all of this? Ummm...bad idea, especially for someone with absolutely no sense of balance. I nearly bought the farm several times while climbing up and down to pick up the few hundred finishing nails that I kept dropping....During one particular, "Woopsie, now I'm gonna die..." near-fall, I caught myself...on the mantel (which isn't attached to the wall quite yet), and I felt the stool, the mantel and myself all going different directions at once, in agreement with the Law of Gravity. As my life flashed before my eyes, I was somehow able to regain balance and avoid a very costly hospital bill (or funeral). After that, I went ahead and took the two minutes to grab the ladder from the garage.
Oh, another obvious safety Lesson: Remember when I said I climbed on top of a bar stool to hang all of this? Ummm...bad idea, especially for someone with absolutely no sense of balance. I nearly bought the farm several times while climbing up and down to pick up the few hundred finishing nails that I kept dropping....During one particular, "Woopsie, now I'm gonna die..." near-fall, I caught myself...on the mantel (which isn't attached to the wall quite yet), and I felt the stool, the mantel and myself all going different directions at once, in agreement with the Law of Gravity. As my life flashed before my eyes, I was somehow able to regain balance and avoid a very costly hospital bill (or funeral). After that, I went ahead and took the two minutes to grab the ladder from the garage.
I was done hanging the wall gallery in only 5 hours. Just in time to avoid a complete nervous breakdown.
Very character building.
Very character building.

I did come up with one little trick at the end that I found useful (I would have found it even more useful had I come up with it about 3 hours earlier) which I will share just in case you end up in the same predicament (unless you are the type to think things through):
For the last frame, I was having a hard time getting it in the exact right position, considering it was 3 feet tall and I was already up 5 feet in the air, since I had already put several holes in the wall I figured a few more couldn't hurt and I put some "guide nails" on one of the sides as well as the bottom of the frame in order to keep the spacing right as I hung the top, like this:
For the last frame, I was having a hard time getting it in the exact right position, considering it was 3 feet tall and I was already up 5 feet in the air, since I had already put several holes in the wall I figured a few more couldn't hurt and I put some "guide nails" on one of the sides as well as the bottom of the frame in order to keep the spacing right as I hung the top, like this:

These helped because I just had to hold the frame tight against both nails in order to make sure I was keeping the space I needed as well as keeping it straight at the same time.
After the wall gallery was finally done, I had to get started on decorating the mantel, which I didn't want to spend a lot of money on, either.
I took a wire vase that used to be in my kitchen and looked like this:

I spray painted it white, and put some ornaments from Target in it to make it look like this:

On the other side, I took a wire reindeer that was originally bronze and spray painted it silver and then took a small berry wreath and put it around its neck. I also took the stick-plant thingy from my kitchen table that looked like this:

On the other side, I took a wire reindeer that was originally bronze and spray painted it silver and then took a small berry wreath and put it around its neck. I also took the stick-plant thingy from my kitchen table that looked like this:

and then spray painted it all in silver.
After looking at it for a few minutes, I decided it looked a little too "Danger, Will Robinson, Danger!!" AKA "Lost in Space-ish", so I went over the sticks with white paint and took a Christmas floral bundle apart that was $1.50 from Hobby Lobby and inserted the branches throughout the sticks. I repainted the bottom turquoise and put a red bow around it to make it look like this:

The "Believe" sign was also originally black, but I repainted it red, so it would stand out more on the mantel.


I still wasn't done.
I also wanted something a little unique for the bottom of the fireplace and decided to create a little area for Santa.
I already had the chair and birdhouse and my sister had left the bench at my house for me to sell at a yard sale that I never got to, so I set them up and then decided that the bench needed a little something, so I decided to make a "tray" for Santa.
I painted a wooden one from Hobby Lobby red and then made "cookies" out of some clay I found from a project that Diva did for school. I painted the inside of a glass white and then shoved a paper towel in for "milk". Destructo wrote a note for Santa that I also put on the tray.


My favorite part is the sign:

My kids have food allergies and one of them, I won't say who...(Diva) always says that she is allergic to something when she doesn't want to eat it, so I took my inspiration from them.
...and that, my friends, is the story of my first ever Christmas DIY project and my first ever Christmas mantel.
Project Break Down:
Paint: $5 for the red paint (Americana Acrylic Paint in "Cherry Red") and two shades of brown acrylic paint for the "cookies". I already had all of the blue paint and the white spray paint "in stock".
Chicken Wire: $13
Santa: $12
Chalk board: $7
Snowflake Pillow (Target): $14
Santa's Tray: $3 for the tray itself ( Diva already had clay that I used and painted with brown acrylic paint)
Ornaments for vase and to hang in "fireplace": $10
Garlands ( Pine branch, Silver Icicle (Hobby Lobby) and beaded red: $28
Frames: I only had to buy two because I had all of the others "in stock" from my D.I. trips. The center one was a splurge at $10 but I am in love with it. The other was only $5
Chip letters: the small were $2.99 per pack (I needed 3) and the large were $1.99 each - $18 total
Mini Clothespins: $2
Scrapbook Paper: $3
Total: Approx. $125
Linked To:
There is a code you can type into your blog so that people can't copy your pictures, if you are interested.
ReplyDeletewell done.I am so inspired now, I think I may decorate the tread mill again this year.
ReplyDeleteThat would take me several weeks not 5 hours! Respect. I need you to come and help me with my empty walls!
ReplyDelete