Tuesday, February 5, 2013

Why I'm So Glad I Didn't Throw the Ottoman Through the Wall!

A couple of days ago, I submitted the Restoration Hardware Knock-off Ottoman to one of my favorite blogs, Knock of Decor.

I figured they probably get about 4,362 emails a day, or so from bloggers wanting to submit items, so I thought it would either be a long time to hear back, or that I might not hear back at all. I mean, I love my ottoman (We've come to appreciate each other after all the trauma we went through.), but would Knock Off Decor?

Well, apparently, they did like it! Yesterday, I got an email from Beckie over there letting me know that the ottoman would be featured today and I about did nekkid somersaults across the house! I don't know if I can really explain how excited I am to see it posted over there this morning. I mean, this is a blog that I cruise every day full of awesome creativity from bloggers all over, thinking..."Now, why didn't I think of that?"

So, I'm feeling pretty great in my jammies, with no bra (too much?), and morning hair, right now and I really want to thank Beckie for featuring the ottoman that nearly killed me, as well as my friend Kenz who suggested I submit it after she let me guest post it on her blog. It turns out hard work did pay off in this situation and I think I shall reward myself with a cupcake from Kneaders (a local bakery) in honor of the feature as soon as I drop that slow-poke Diva off at school (Destructo is in Disneyland with Grandpa...I know, right? No fair!).

Then, it's time to work on my next project, Destructo's new bedroom. It's gonna be so sick, or the bomb. or whatever the kids say, these days. I cannot wait to show you how it turns out!

Oh, and if your visiting from over at Knock Off Decor, THANK YOU for dropping by and I hope you'll take a look around and join me here, on Facebook, or those other social networking sites! I love meeting new friends and taking a look at your blogs, too!

Okay, I'm off to put that bra on and brush my hair so I can go check Diva into school, get my cupcake (or two) and then I'll be back later today, or tomorrow to post about that giveaway I promised you!


Saturday, February 2, 2013

An Ottoman Inspired by Restoration Hardware

Well, hello there! I can't believe it's been over a week since my last post! I do have an excuse as I've been feeling a tad worn out and just plain icky for the last week (Currently, my voice sounds like it belongs to a 72 year old smoker from Boca Raton.) but, I'm back today to give you more information about my Restoration Hardware knock off ottoman I posted about over on Interiors by Kenz, yesterday. (By the way, if you haven't checked out Kenz and her blog, you must!! She's totally awesome!).

You've heard a little about the ottoman already, when I explained a slight issue I had when I attempted to do some tufting for the first time (which you'll be happy to know has been resolved...I think so, anyway...). but, now I'll go into more detail regarding the transformation from the "I think I'm southwestern?" ottoman to the new Restoration Hardware-like version.

Here's a little picture comparing the original version to the final version:


You should totally keep reading to hear about my story of how I was able to save the ottoman....and my sanity (well, almost.)

Thursday, January 17, 2013

It Seemed Like a Good Idea at the Time....

You know how you sometimes decide to start a task before thinking through things first? and then you start the process and realize that you just did a BIG "OOPSIE!!", but there is no going back now?

and then after you are finished, you just know you are in BIG TROUBLE!?

Well, I sorta did just that.

...and I'm a tad horrified at the moment.

(side note: Liquid Nails is a fantastic product that does EXACTLY what it says.)

Okay, here's what happened:

You know my living room wall that I was planning on putting my faux-fireplace on and how we had put that faux white brick behind it?


Well, due to the fact that we are now making that room into an office and moving the faux-fireplace into the main living room, the white brick needed to go.


Now, I could have been patient and waited. I could have not grabbed the crow bar. I could have listened to my inner-voice saying, 

"Jen, maybe you should re-think this before you pull sheet rock off the wall..."

but, I didn't.

Instead, I grabbed the crow bar and pulled on a teeny-tiny corner of the paneling to see if I could even pull any of it off the wall.


But a much bigger part came detached from the wall.


and then I did that thing that I always do, but know better.

I figured it was too late for logic and went a little crow-bar crazy.

The good news is the brick paneling is gone.


The bad news is that my wall looks like this:
(Now, I know why people end up just painting paneling instead of removing it during renovations.)


About an hour later....

Studly walks through the front door, right past the living room, and says "hi" when he sees me sitting at the kitchen table, innocently.

Me: Did you notice anything?

Studly: Oh, yeah, you moved the hutch.

Me: Anything else?
Anything?

Studly walks back to living room wondering what he missed and I hear:

"Oh, Shit!"

...My idea of doing Board and Batten in that room is starting to look a lot better, now....


Saturday, January 12, 2013

Well, that's just "Fridge-Tastic"!

Okay, I get it. When you are renting, you have to deal with a few things like slightly overused appliances, but a couple of days ago, after we FINALLY went grocery shopping (we were literally eating breadcrumbs, it had been so long), we realized our fridge had some issues. Some we had noticed before, others we had not, and some of those we noticed before became a little more obvious and required the attention of duct tape due to the weight of the massive amount of food we had bought.

I'll give you the grand tour. 

With pride in my heart, I present to you...

Our "FRIDGE-TASTIC" Fridge!
(applause, please.)


Not bad looking, eh?

Well, except for a couple of buttons missing on the water fountain thingy:


Hot? or Cold?
Who really cares? Neither of them work. Luckily it's stuck on cold.


I think that's the most food we've had in our fridge, like ever. Still, there's a little something different about the inside of the fridge...

"One of these things just doesn't belong...."

(Oh, how I miss you, Sesame Street!)


Did you notice it?


How about now?

Yes, that shelf frame actually cracked in half, as I was putting juice on it. 
I was lucky enough to get away without injury.
I was not lucky enough to get away without spewing profanity.

It's actually what motivated us to start the fridge "makeover", as in that minute.

Anyway....

Moving on to the refrigerator doors:

We'll start with the freezer door first.
Nothing to see here.
Literally.


And on to the refrigerator door:

 where we shall see more duct tape...
Before the "repair", we just didn't put anything in that bin. 


But that was just one of them. 
We actually had two of them with the same problem. 
The other was cracked on both sides. 


But, we fixed that one, too.

I'm assuming so, anyway. 
We haven't heard a huge crash at 2 in the morning, yet.
Maybe, the Whirlpool man will accidentally drop one off at our door...

Not likely.

But, I do want to thank you for attending the tour of my "Fridge-Tastic" Fridge.

(Beat that, Miss Mustard Seed!!)


Monday, January 7, 2013

How To Tuft an Ottoman (like an idiot).

So...there's this ottoman that I've been reupholstering....Seems pretty simple, right? Like maybe it would take just a few hours?

Nope, not for this idiot. 

But, we'll start at the beginning of the story:

It all started when I saw this at my sister's house:


I totally loved it and in a delusional state of mind felt sort of confident I could totally make it look more like this:

"Nancy" tufted ottoman by Horchow 
It couldn't be that hard to reupholster it and redo the tufting, right? It already had the holes pre-drilled and so it would be easy to figure out where I needed to guide the needle in order to fasten the buttons on. I mean, I took about 5 seconds to scan another DIY bloggers instructions researched and read a bunch of tutorials on how to do tufting, and it really didn't seem that difficult. I figured I could pull it off.

I already knew what fabric I was going to use to reupholster it, too. I had gotten about 2 yards of this beautiful light blue damask print on the clearance rack at Home Fabrics for $4 and been saving it for something...I just didn't know what...until this unfortunate looking ottoman came into my life and made me realize that they would be a perfect match for each other.

So, after procrastinating for a few months, I started the process of recovering it one night a few weeks ago while watching a fine piece of cinematic art known as "Zombieland" (It was right before Dec. 21st, so Studly and I were getting some tips on what to do if the Mayans were right). As I was working on it, I ended up deciding not to tuft it (well, not so much decided, as I completely forgot to until I had 3 sides stapled tightly to the frame...). But, it looked pretty good without them, anyway.Then, I got to the corners and after fussing with them for almost an hour, I decided that at one in the morning I was in no mood to deal with their crap. I would work on it again the next day (which happened to mean 3 weeks later).

 Anyway, when I saw it sitting in the corner of my bedroom this afternoon, I figured that I better get it finished up since I had a couple hours to kill. Oh, and then I changed my mind and decided I wanted to do the tufting after all, so I got to work removing staples off of one of the sides, so I would have room to pull the fabric tight after I was finished doing the tufting. 

After I was through with that part, I grabbed the tufting buttons, left over fabric, upholstery needle and fishing line (it works just like upholstery thread, right?) and was ready to go. I thought it would be super easy to just snap fabric to the button after glancing at the pictures from the tutorial on that blog I read "in detail". It turns out that it wasn't so super easy. It was actually really hard and really frustrating! I could not believe how hard it was to tuck the fabric into the bottom of the cap part and then snap the base into it. After about a half hour of working on one button that just wouldn't cooperate, I took "Old Betty" out (my affectionately named glue gun) and just glued the fabric into place on the underside of the cap part. The bottom still wouldn't snap into it, so I figured I would just use hot glue on that, too. Why not? So, I proceeded to "finish" my fabric buttons via hot glue. Then, I grabbed some fishing line, and threaded it through the upholstery needle and the back of one of the buttons. I was feeling confident that I was finally in business. 

After a few misses (two huge puncture holes that I'm really hoping won't be noticeable if I do ever finish it), I was able to find the hole in the base of the ottoman with my murder weapon 12 inch upholstery needle and started pulling the fishing line through it, pulling really tight to make the "dent" in the ottoman with the button, but I soon realized fishing line may  not be the best type of thread to use when tufting an ottoman that is almost all foam, when I tied it and it disappeared back into the ottoman somewhere. Frustrated, I figured I would go to the fabric store in the morning and actually get some tufting twine to finish the job.

...and then I looked at the package containing the fabric buttons one more time:


Yes, I accidentally bought a REFILL pack AND it was a refill pack for only one part of the buttons! Apparently, there are 4 parts to a fabric button and they come in a KIT, which explains the issue I was having trying to assemble the damn things. Who knew? (probably about every other person who has ever done tufting.)

It appears that I need to learn to read before I run to the fabric store, tomorrow. 


Friday, December 28, 2012

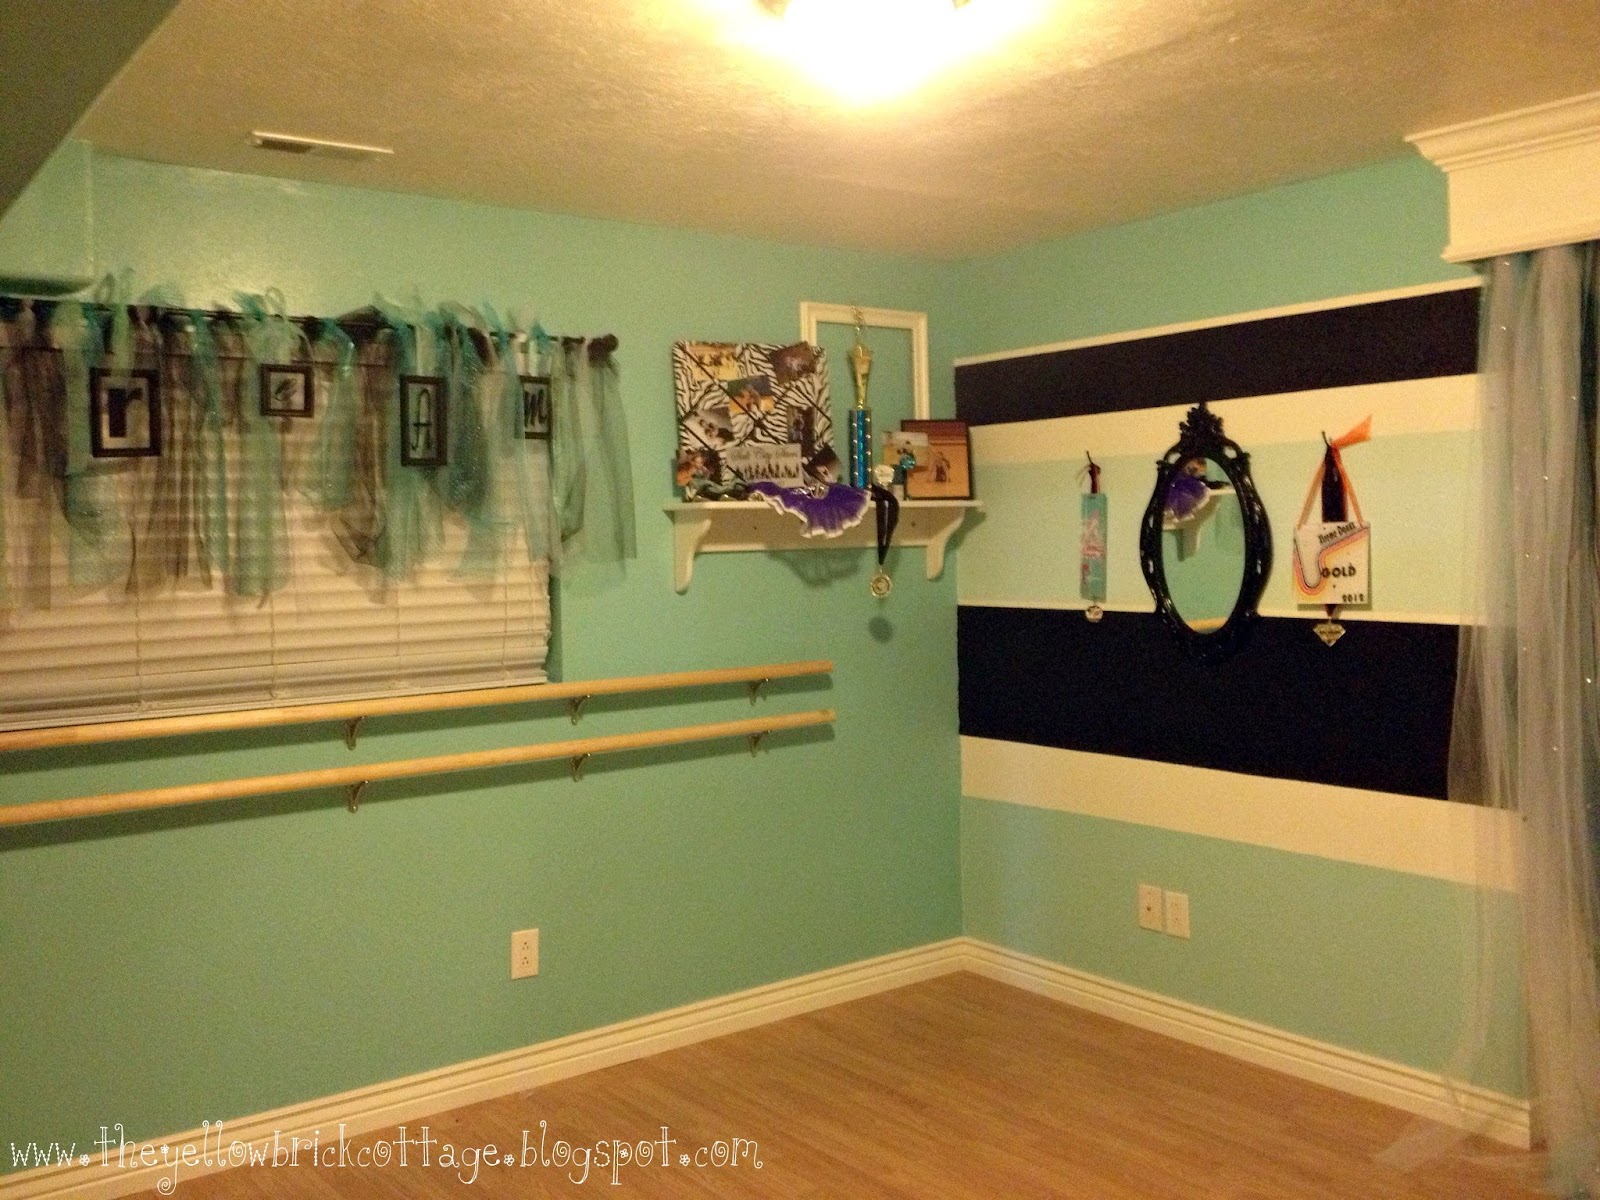
The New "Dance Studio" Room

Here it is! Part 4 of "The Dance Studio" project is finally here!!

It's time for the big room reveal that I have been impatiently waiting for! On Christmas day,  we finally finished our first "official" room in the house, a dance studio room for Diva: 

It took two months to complete and a lot of work, but it turned out even better than I thought it would!


It all started with the realization that Diva literally had nowhere to practice her choreography, which became glaringly obvious one night when she accidentally stabbed me in the face with a prop and then hit herself in the head with the same prop trying to avoid the T.V. armoire and me as she attempted to practice with it.

As big as this house is, it is all ugly carpet upstairs, except for the equally ugly tile in the kitchen and that's taken up by the island. Not exactly ideal for turns.

{Can you tell I'm dying to rip that crap out the minute I get a chance?} 

Anywhoo, we had to figure out how to get her some room to practice her leaps and turns. We thought we would try putting down a temporary dance floor in the unfinished area, but after pricing those out, we realized putting in an actual laminate floor was a lot cheaper and would actually work better. We just needed more of a defined space to put it in to keep it in place, so we ended up choosing what most people would consider the "catch-all" room (and ours truly lived up to the title). The room was large enough for some decent practice space and we didn't have to rip out any existing floors in order to install the new dance floor.

It wasn't too shabby of a starting point, except for the awful, gonna-make-me-puke wall color and the lack of...umm...a floor, barre, and mirror. 

Oh, and this weird little characteristic came with it...

{No, I didn't rotate the picture, that's how the outlets are in the room. I'm guessing it was a mistake...or that we are supposed to stand on our heads whenever we go in there...}

Keep reading for the entire process including the awesome before and after shots:

Thursday, December 27, 2012

A Cozy Closet Nook

I have always wanted to have a window seat or a nook somewhere in my house. I had pictured building one many times over in some future master bedroom of mine, or since Diva is an avid reader, I also thought one in her bedroom would also be awesome. I could just picture her curled up in one with one of her books on a rainy afternoon, but I never had the time or ability to build one, so I kind of forgot about it.

...until I was cleaning out the "catch-all" room down stairs in order to build Diva's "Dance Studio" room.


As I looked at all the crap crammed in the closet, I realized that it was a perfect place to create that nook that I had always wanted. A closet wasn't terribly necessary in this room, anyway and it would also be a great seating area for me when I watched her practice (I've been kicked and hit with props more time than I care to admit). I quickly came up with a picture in my head of how I wanted it to look, but the key was getting it to turn out like that picture. Well, after some much appreciated help from my dad, we were able to pull it off and it turned out totally fantabulous!


Doesn't it look cozy? I totally love it!

I'll explain the process the best I can (with a few more pictures):